
To prevent cold air from entering your home during winter, and hot air from flowing in during summer, you need to close up the gaps in your windows to create a tight seal.
Not only will your home feel more comfortable, you will also lower your monthly energy costs with these inexpensive window weatherization tools.
Rope Caulk
Caulking is a method of weatherstripping that targets the crack, gap, hole, or opening that allows air to seep through. Basically it’s like sticking silly putty in the exposed area to seal it off. However, rope caulk provides a better stick, can weatherproof windows in any weather condition, and blends in with your decor.
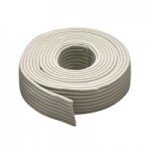
Installation:
- Clean, clean, clean the area where caulk will be used.
- Peel of a lay of the rope caulk “beads” and divide it based on how much you need.
- Press to seal.
Foam Tape
Foam tape is used to seal windows that slide or swing. It sticks to the edges or bottoms of windows to prevent air leakage when windows are closed.
Installation: Foam tape is easy to install and at less than $3 it is an inexpensive weatherization solution.
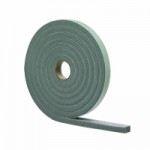
- First, clean and dry the area where the tape will be applied. If the area is dirty, wet, and/or cold, the tape won’t stick properly or it will easily loose its stickiness factor. It must be more than 40 degrees Fahrenheit.
- Cut the amount of foam tape needed based on the length of window sides/bottom.
- Remove the adhesive backing then press the tape into place to cover the area in need of sealing.
Shrink and Seal Window Kit
If you have scissors, a blow dryer, and $4 you can easily weatherproof windows with a Shrink and Seal Window kit. This kit will seal the whole window from the inside and increase the R-value, or insulating power, of the window by as much as 90%.
Installation: 
- Again, you need to clean and dry the area before applying any sealing. You should also clean the insides of windows because you won’t be able to clean that area again until you remove the shrink film.
- Cut the amount of shrink film needed. Cut enough film to cover the entire window (including some of the frame area).
- Remove the backing from one side of the two-sided tape and stick it to the top, bottom, and sides of the window. After installing the tape, remove the adhesive backing from the other side.
- Apply the shrink film around the window, gently stretching it as you work your way from one corner of the window to the other.
- With the blow dryer on the highest setting, slowly move the dryer across the film to tighten it over the window. Don’t stand too close to the window while doing this, otherwise you’ll melt the shrink film.
- Trim any film that’s left over.